Caching
Honocord uses a modular caching system that allows you to easily integrate different caching backends, such as in-memory, Durable Objects, MongoDB, or your own custom implementation. This guide will walk you through the basics of Honocord’s caching system, how to set it up, and best practices for using it in your implementation.
Cache Adapters
Section titled “Cache Adapters”Honocord provides several built-in cache adapters:
MemoryCacheAdapter- A simple in-memory cache adapter for quick caching needsDurableObjectCacheAdapter- A cache adapter that uses Cloudflare Durable Objects for caching on WorkersMongoCacheAdapter- A cache adapter that uses MongoDB for caching
You can also create your own custom cache adapter by implementing the abstract BaseCacheAdapter class.
It is important to note that you cannot use every adapter in every environment.
| Adapter | Cloudflare Workers | Node.js / Bun |
|---|---|---|
| MemoryCacheAdapter | ❌ | ✅ |
| DurableObjectCacheAdapter | ✅ | ❌ |
| MongoCacheAdapter * | ? | ✅ |
* I’m not really sure about this one, it could work on CF Workers, but I haven’t tested it yet. If you try it out, let me know how it goes!
Setting Up Caching
Section titled “Setting Up Caching”Every caching setup is basically the same, as you have to use the withCache method on the Honocord instance to provide a factory function that creates your cache adapter.
Only the setup before that may vary slightly based on the adapter.
Installation
Section titled “Installation”pnpm add @honocord/cache-memorypnpm add @honocord/cache-dopnpm add @honocord/cache-mongopnpm add @honocord/cache-base # for custom adaptersimport { Honocord } from "honocord";import { MemoryCacheAdapter } from "@honocord/cache-memory";
const cache = new MemoryCacheAdapter({ ttl: 300, cleanupInterval: 600, // Interval in seconds for automatic cleanup of expired entries. This is only supported by this adapter as of now.});const bot = new Honocord().withCache(() => cache);This setup requires a bit more work, as you need to set up a Durable Object and bind it to your Worker.
Honoord Setup
Section titled “Honoord Setup”import { Honocord } from "honocord";import { DurableObjectCacheAdapter } from "@honocord/cache-do";
const bot = new Honocord().withCache<Cloudflare.Env>((env) => new DurableObjectCacheAdapter(env.MY_CACHE_DO));
export default bot.getApp();
export { HonocordCacheDO } from "@honocord/cache-do"; // You need to export the Durable Object class so you can use itWorker Setup
Section titled “Worker Setup”{ // ... other config options "durable_objects": { "bindings": [ { "name": "MY_CACHE_DO", // This is the binding name that is used by the `env` in the factory function "class_name": "HonocordCacheDO" // This is the class you exported from your index.ts file } ] }, "migrations": [ { "tag": "v1", "new_sqlite_classes": ["HonocordCacheDO"] // This is the class you exported from your index.ts file } ]}migrationsare required to create the Durable Object namespace - you don’t need to write any migration code, just having this here is enough for Wrangler to create the namespace for you
Why do I need to export the Durable Object class?
You might ask, why do I need to export the Durable Object class from my index.ts file?
CF Workers is a edge runtime, which means that you don’t have any in-memory state that persists across requests.
A Durable Object is a special type of object that runs on the edge and can maintain state across requests, but it needs to be defined in your code because it is a part of your Worker, not Honocord itself.
Honocord already does the heavy lifting of implementing the Durable Object and providing an adapter for it, but you still need to define it in your code so that Wrangler can create the namespace for it.
import { Honocord } from "honocord";import { MongoCacheAdapter } from "@honocord/cache-mongo";
const cache = new MongoCacheAdapter(process.env.MONGO_URI!);await cache.connect(); // You need to connect to the database before using the cache adapter
const bot = new Honocord().withCache(() => cache);
This is fairly straightforward, you just need to make sure to provide the correct MongoDB URI before using the cache adapter. You can either self-host a MongoDB instance or use a cloud provider like MongoDB Atlas.
Working with the Cache
Section titled “Working with the Cache”The cache polulates automatically every time an interaction is received.
However, some things are not automatically cached due to Discord only providing partial objects in certain cases. This includes:
- Guilds - Discord only sends a partial guild object with id, features and the preferred locale; This doesn’t need to be cached.
- Resolved Channels - When a user interacts with a message component or a modal, and it has a channel select menu where resolved channels are included in the interaction data, those channels are not automatically cached. These channels are only partial and don’t include any useful information other than the ID and type.
Under the Hood
Section titled “Under the Hood”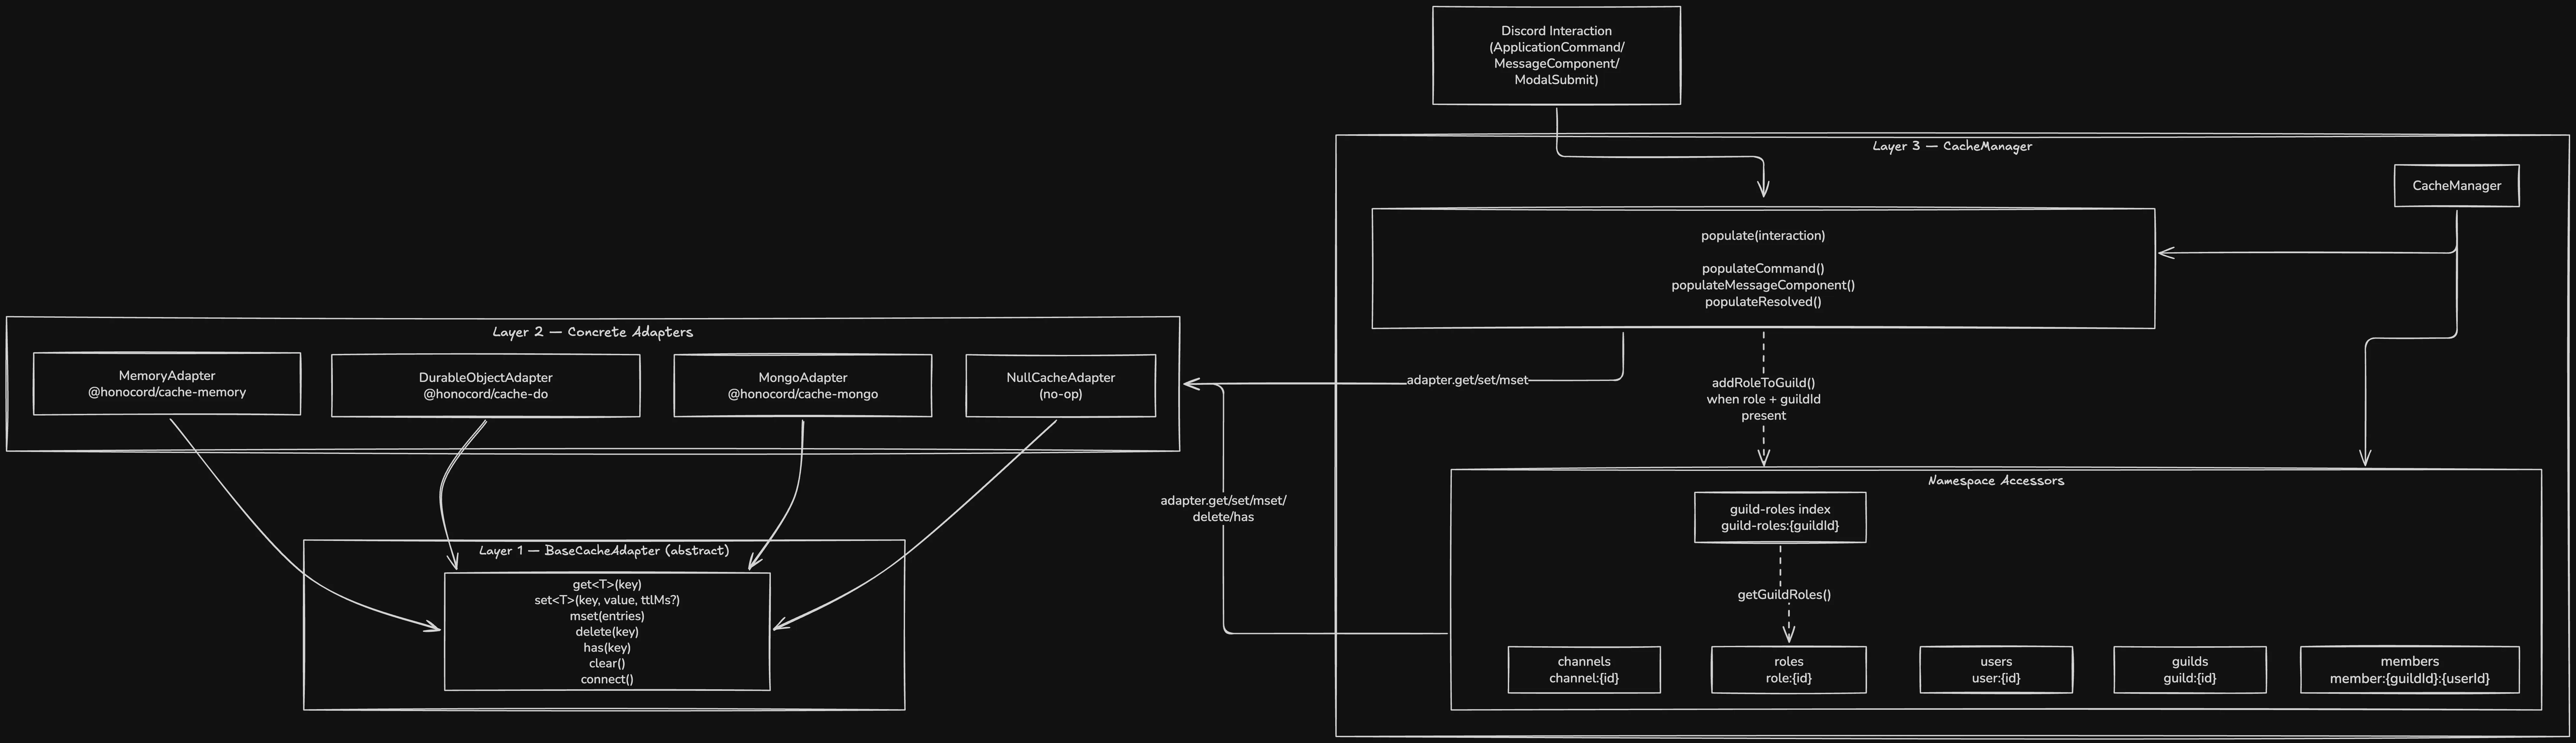
As you can see, you effectivly only have to interact with the CacheManager. The CacheManager is responsible for managing the different namespaces and providing a unified interface for accessing the cache.
When you call ctx.cache.getUser(userId), the CacheManager will delegate the call to the appropriate namespace accessor, which will then interact with the underlying cache adapter to retrieve the data.
Custom Cache Adapters
Section titled “Custom Cache Adapters”If you write a custom cache adapter, you only need to extend the abstract BaseCacheAdapter class and implement the required methods.
import Redis from "iovalkey"; // works for both Valkey AND Redis
export class RedisCacheAdapter implements CacheAdapter {  private client: Redis;  private ready: Promise<void>;
  constructor(urlOrOptions: string | Redis.RedisOptions) {    this.client = new Redis(urlOrOptions as any);    this.ready = new Promise((resolve, reject) => {      this.client.once("ready", resolve);      this.client.once("error", reject);    });  }
  async connect(): Promise<this> {    await this.ready;    return this;  }
  async get<T>(key: string): Promise<T | null> {    await this.ready;    const val = await this.client.get(key);    if (!val) return null;    return JSON.parse(val) as T;  }
  async set<T>(key: string, value: T, ttlMs?: number): Promise<void> {    await this.ready;    const serialized = JSON.stringify(value);    if (ttlMs) {      await this.client.set(key, serialized, "PX", ttlMs); // PX = milliseconds TTL    } else {      await this.client.set(key, serialized);    }  }
  async mset(entries: { key: string; value: unknown; ttlMs?: number }[]): Promise<void> {    await this.ready;    if (entries.length === 0) return;
    const pipeline = this.client.pipeline();
    for (const { key, value, ttlMs } of entries) {      const serialized = JSON.stringify(value);      if (ttlMs) {        pipeline.set(key, serialized, "PX", ttlMs);      } else {        pipeline.set(key, serialized);      }    }
    await pipeline.exec();  }
  async delete(key: string): Promise<void> {    await this.ready;    await this.client.del(key);  }
  async clear(): Promise<void> {    await this.ready;    await this.client.flushdb();  }}
Then use it with Honocord just like any built-in adapter:
import { Honocord } from "honocord";import { RedisCacheAdapter } from "./RedisCacheAdapter";
const cache = new RedisCacheAdapter(process.env.REDIS_URL!, {  namespace: "my-bot",  ttl: 300, // 5-minute default TTL});await cache.connect(); // You can also don't do this and let Honocord handle connecting, but doing it yourself allows you to catch connection errors at startup
const bot = new Honocord().withCache(() => cache);
Fetching
Section titled “Fetching”On every interaction, you have a property .fetcher which is an instance of Fetcher.
The Fetcher is a utility class that provides methods for fetching data from the Discord API and automatically caching it, if not already cached.
For example, if you want to fetch a user by their ID, you can do:
const user = await ctx.fetcher.users.get(userId);This will first check if the user is already cached, and if so, it will return the cached user. If not, it will fetch the user from the Discord API, cache it, and then return it.